
As you search for how to install extension in Magento 2, we guess that you have followed all the instructions of the providers.
But the installation failed!
You are confused and do not know how to deal with this.
Fortunately, we will tell you how to install extension in Magento 2 or Magento websites here.
Read this article to know:
- How to install extension in Magento 2 manually in 4 ways
- Also, how to install Magento extension and fix common errors
- Finally, how to install extensions from Marketplace.
How to Install Extension in Magento 2 Manually?

These instructions below, followed by the tutorial of Belvg, about how to install the Magento 2 extension manually.
Thanks a lot for their contribution and sharing.
Magento 2 gives you a huge opportunity to manually install modules by using various methods via a composer, via a zip file, and via a browse.
The method that is chosen depends on how a module appears in the system.
There are two ways that a module can appear in the system:
#1. It is bought in the Magento store.
You need to create 2 access keys in your marketplace account.
These keys can be added to the Magento admin panel if Magento is accurately configured. After that, you can take control of the installation of any purchased packages here. As the module is synchronized with your Magento marketplace account.
In case you are an advanced user and have the ability to use the server console, the module can be installed via composer.
The keys are essential here, so if they are not saved previously, you need to enter the keys in the system.
#2. Module installation from third-party sources
You can get it in the form of a zip file. You can be given a link to a third-party repository such as GitHub. Installation from it can be done through a composer.
Now, we will show you thorough steps about how to install Magento 2 extension manually.
Install Magento 2 Extension from A Zip File
When you wonder about how to install Magento 2 extension from a zip file, check steps below:
The first thing you need to do is copying its code to the required directory.
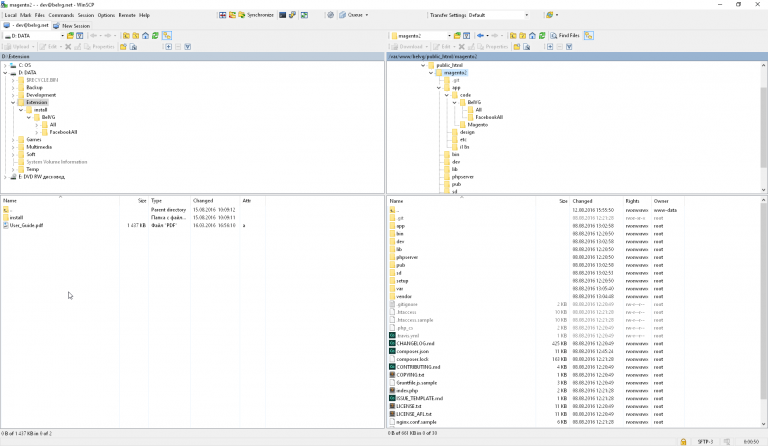
The picture above shows:
- The basic listing of the zip file with a module is on the left panel.
- Magento 2 codebase is shown on the right panel.
User_Guide.fpt file and the install directory are contained in the current zip file.
Moreover, the install folder content should be copied to the app/code/directory.
Finally, we can use two different methods to initialize the module in the Magento store.
Install Magento 2 Extension from A Zip File Via A Browse
Cron tasks setting up and proper running are required in this method to achieve a successful installation.
In case it has not performed yet- let’s do it with configure and run cron documentation before turning the next step.
After the Cron is set up correctly, you can follow the path in the admin panel to initialize the module:
System => Web Setup Wizard => Component Manager.
In this step, you can be able to access all available modules.

You can see the notification that all of the systems run correctly in case Magento is set up properly.
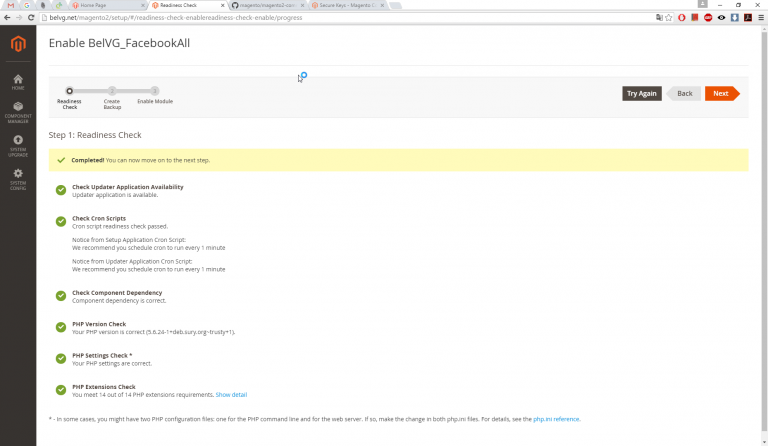
In addition, before you enable the custom module in Magento 2, backup creation will be proposed.
In the final step, we will see the following screen:
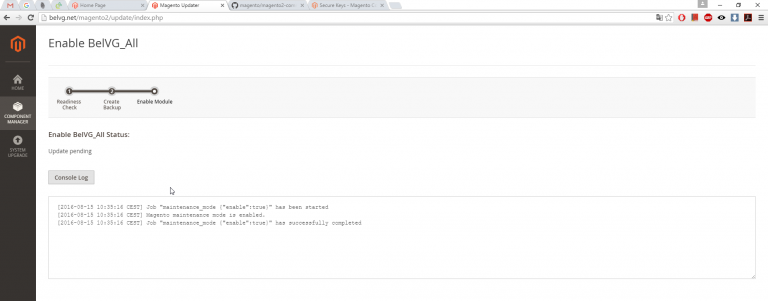
The module has been enabled and you can switch back to the module list and install the next one.
That is all about how to install Magento 2 extension from a zip file and via a browse.
Install Magento 2 Extension from A Composer
If you know how to use the server console, this will be your competitive advantage to install this module via the composer.
The composer is a file called composer.phar and it can be downloaded from getcomposer.org.
Furthermore, it is launched from the Magento root directory. The folder should contain composer.json with the configuration of the installed libraries.
php composer.phar <command>If the composer is available on the server, then you do not need to download it anymore.
You can use it in the following form:
composer <command>- If the module is distributed from the Magento repository, we can just run the following commands:
php composer.phar require [vendor]/[package]
php bin/magento setup:upgrade- Another solution is a module from a third-party repository. You need to specify in the composer.json file.
In the “require part”, you can indicate the name of the module that you add.
{

   . . . . .

   "require": {

        . . . . .

   "vendor/package": "version"

 },

 .....

}
If the third-party repository is, for example, GitHub, you will need to specify it in the “repositories” branch.
{ . . . . . “repositories”: { . . . . . { “type”: “git”, “url”: “https://github.com/ . . . . .” } }, ….. }
In this step, all the data is provided with a module.
Next, after saving the file, run the following commands:
For example, let’s take a look at the installation of one of Belvg’s free modules located in the GitHub repository.
Since the module is not installed from the Magento repository, it will be added to composer.json file.
<?{

   . . .

   "repositories": [

       . . .

       {

           "type": "vcs",

           "url": "https://github.com/belvg-public/Magento2_ApplyTo"

       }

   ],

   . . .

}
And then apply Belgv’s module there:
<?{ . . . “require”: { . . . “belvg/module-applyto”: “dev-master” } }
This only remains to start updating the process.
Apart from it, the necessary modules and add-ons will be downloaded according to changes made to the composer.json file.
<?php composer.phar updateFinally, you can start the installation of all modules in Magento.
<?php bin/magento setup:upgradeInstall Magento 2 Extension Command Line
Magento CLI provides a large number of useful console commands to manage your store. You can get the list of these commands by running:
php bin/magentoOr you can use this command below:
php bin/magento <command>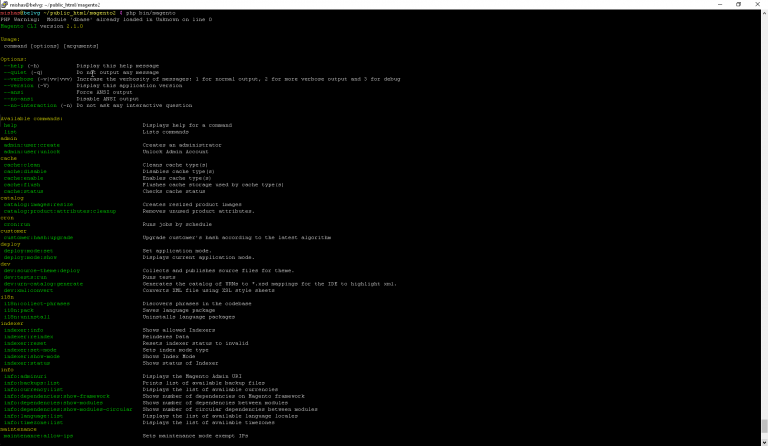
If you think all the commands mentioned above are too sophisticated, you just need to use one command here:
php bin/magento setup:upgradeThis command checks all the modules and launches schema installation or updating process (if necessary).
So all you need is just a command to carry out updating or the installation of all modules.
How to Install Extension in Magento Manually
If you want to find Magento manually install extension more quickly and faster to enhance your online store, have a look at comprehensive instructions of Cminds.com.
Magento Module Install Instruction
Magento install extension command line, for example, had many new features and abilities coded by developers which can help to improve your websites.
There are 3 ways to install extensions via Magento Connect, via SSH or uploading files directly to your FTP that we will show you in this part.
What you need to prepare:
- If you are using a free extension, you will need the product key which is provided by Magento Connect.
- If you are using a paid extension, the files provided by developers and the license keys are necessary if applicable.
Files are updated directly from FTP
Step 1: Upload extension folder to your root directory.
You need to unzip the folder when installing a Magento extension.
This happens where the extension is stored and then the APP folder is copied in your store root directory using your FTP.
Step 2: Take precautionary measures
In the following step, go to the admin panel and take 3 steps below to make sure the process runs fast and safely.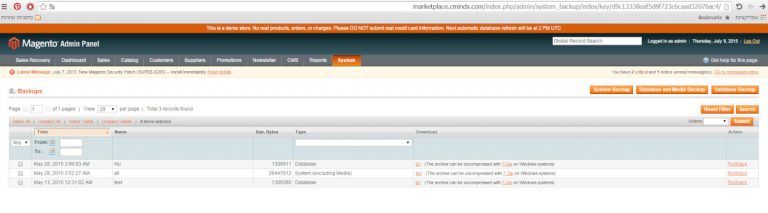
Check whether you have a current backup of your site or not.
- In case you do not have, create one by going to System=>Tool=> Backup.
- Disable compilations via System=> Tool=> Compilations
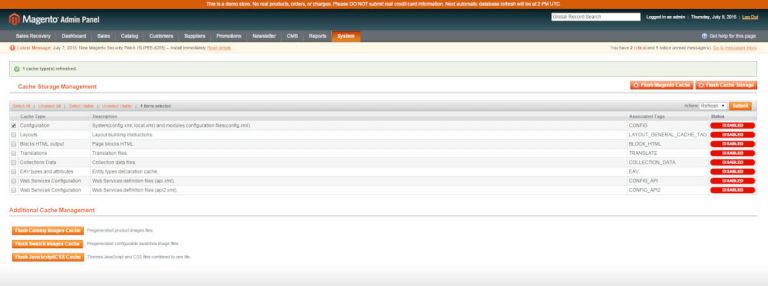
- Clear check by following System=> Cache Management, and then select all files in the list, choosing refresh option in the dropdown menu and click Submit.
 In this step, log out of the admin panel and log back in again.
Step 3: Activate the extension
You can follow the Magento install extension command line:
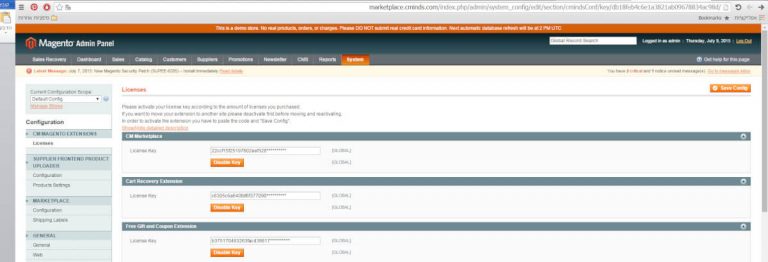
System=> Configuration
In case the extension requires the license key, click license on the left bar and then enter your license key next to the license name.
License keys are so different from product keys of free extensions on Magento Connect.
As they are provided by extension developers when purchasing them.
After entering your license keys, click Save Config and wait to see an approval message to complete install and activate extension successfully.
Step 4: Confirm the installation and activation
Go down to Advanced => Developer and under disable module output to make sure the installation runs smoothly.
The new Magento module install appears on the list and ready to use.
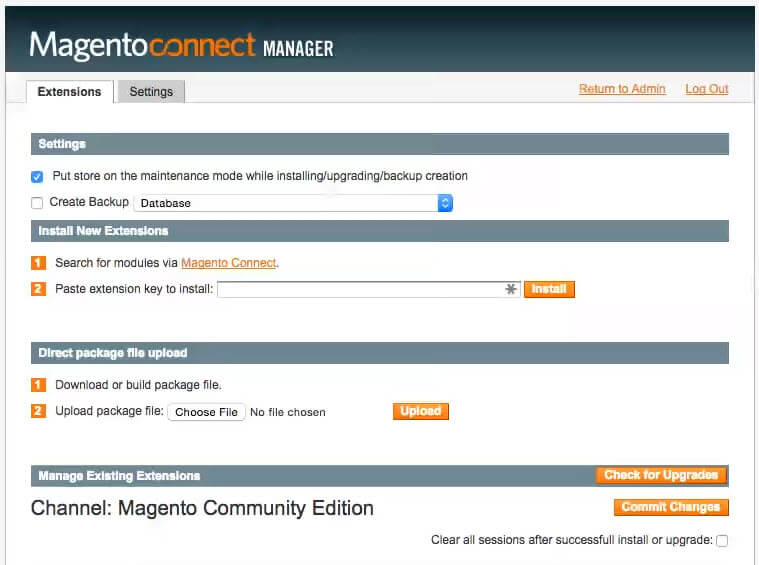
Extension Installation Via Magento Connect
If you fail to install extension manually or want to install free extensions with product keys, you can use Magento Connect.
By going into the marketplace and obtaining your product keys, free extensions can be achieved easily.

Next step, go to System => Magento Connect => Magento Connect Manager in your admin panel and login with the same credentials you use to access the admin panel.
Then, Magento will show all the stages of the process on the screen and ask you to either enter a license key or upload the extension files.
Clear cache or backups are unnecessary in this case as this will be done automatically by Magento Connect.
You need to remember that uploading extensions via Magento Connect can sometimes cause malfunctions because it may upload unwanted files.
Uploading Extension Via SSH
This is an alternative recommendation if you want to upload an extension on your local development box without using downloader UI.
With installation via SSH, all you have to do is download your extension, unzip it and insert it all in a single code straight in the SSH terminal.
Why Magento service temporarily unavailable after extension install
There are some reasons causing Magento service temporarily unavailable after extension install you may not know. In this part, we will recommend you some errors and solutions to deal with this trouble.
Service Temporarily Unavailable in Magento 1
You should check if there is a file “maintenance.flag” in the Magento root folder.
Why?
During the installation process, Magento creates a file called “maintenance.flag”.
So, if Magento checks the file exists, it will show to users the error message as we mentioned above. Generally, it will remove “ maintenance.flag” file after finishing the process.
But there is something wrong and you can not delete it.
Solution
Simply, delete the “maintenance.flag” in the Magento root folder.
Service Temporarily Unavailable in Magento 2
The reason why service temporarily unavailable in Magento 2 is similar to Magento 1. The main difference is that the file now is “ .maintenance.flag”.
Solution
Delete a file called “var/.maintance.flag” in the Magento root folder.
Remove Magento Cache if there is any: “php bin/magento cache:flush”
Another problem: Unable to proceed: the maintenance mode is enabled in Magento 2

<?Unable to proceed: the maintenance mode is enabled.

#0

 /var/www/html/magento/team1/ce207/vendor/magento/framework/App/Bootstrap.php(256):

Magento\Framework\App\Bootstrap->assertMaintenance()

#1 /var/www/html/magento/team1/ce207/index.php(39):

Magento\Framework\App\Bootstrap->run(Object(Magento\Framework\App\Http))

#2 {main}
Solution
Delete a file called “var/.maintenance.flag” in the Magento root folder.
How to Install Extension from Magento Marketplace
If you know about Alibaba, eBay system, you must know how effective of this business module.
The marketplace is a good choice for you to buy a Magento extension. As a result, you can gain more knowledge about how to install extension from Magento Marketplace.
There are two ways to install that you can use according to your preference.
Simple Installations
You can follow these steps below:
- Log in to your Magento account and go to Marketplace=> My Products=> Access
Keep this browser tab open so you can easily retrieve your access key. - In a new browser tab, log in to the Admin of your Magento store as a user with full administrator rights.
- On the Admin sidebar, go to System => Tool => Web Setup Wizard.

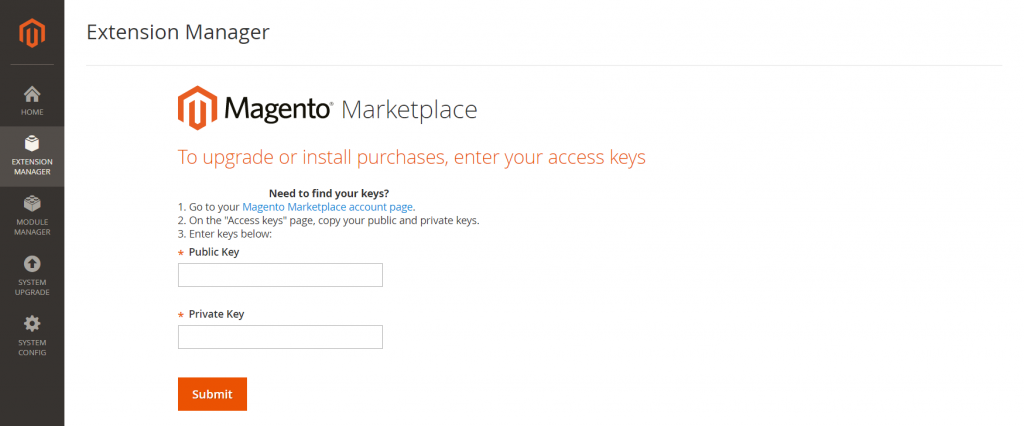
- Click Extension Manager.
- Copy and paste your Public Key and Private Key from your Magento account.
- Then click Submit.
 It might take a few minutes to list all available recently purchased extensions, and currently installed extensions and sample data.
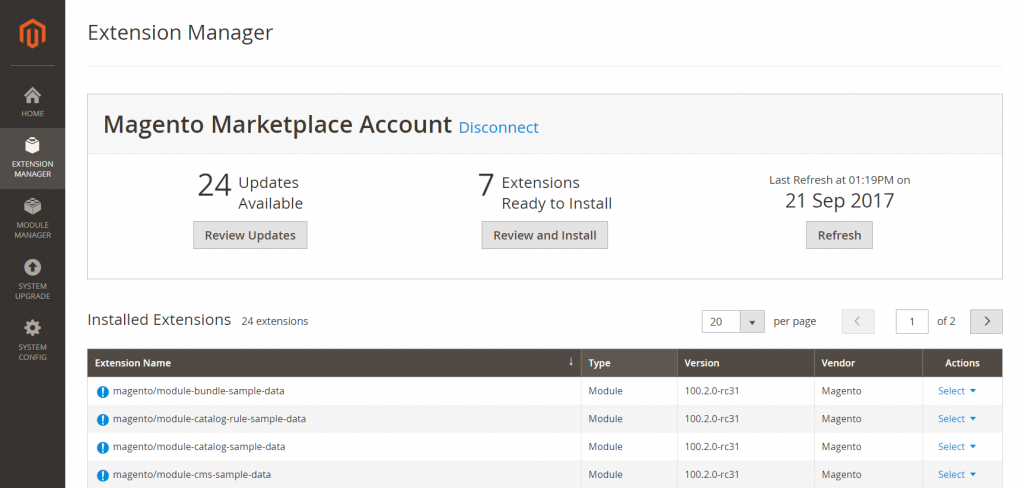
- Locate Extensions Ready to Install at the top of the pages and then review and install. Then follow the steps below:In the list of extensions that are ready to install, select the checkbox of the extension that you want to install.
In the Latest version column, choose the version that you want to install.
In the Action column, click Install - Follow the onscreen instructions and progress indicator to complete the installation.
Advanced Installations
Advanced installations might require the assistance of a system integrator, developer, or IT department to complete the process.
- Some extensions have an installation process that must be completed from the command line of your server.
- Magento installations hosted on Adobe Commerce Cloud require an extension to be installed in a Magento development environment where the integration can be tested and deployed to a staging environment before being pushed to production.
Final Thoughts
After reading this article, you may know How to install extension in Magento 2.
It is so important to carry out the Magento module install as it can bring you many advantages.
Let’s install Magento extension right now to enjoy the best services.